
What is a fairy garden?
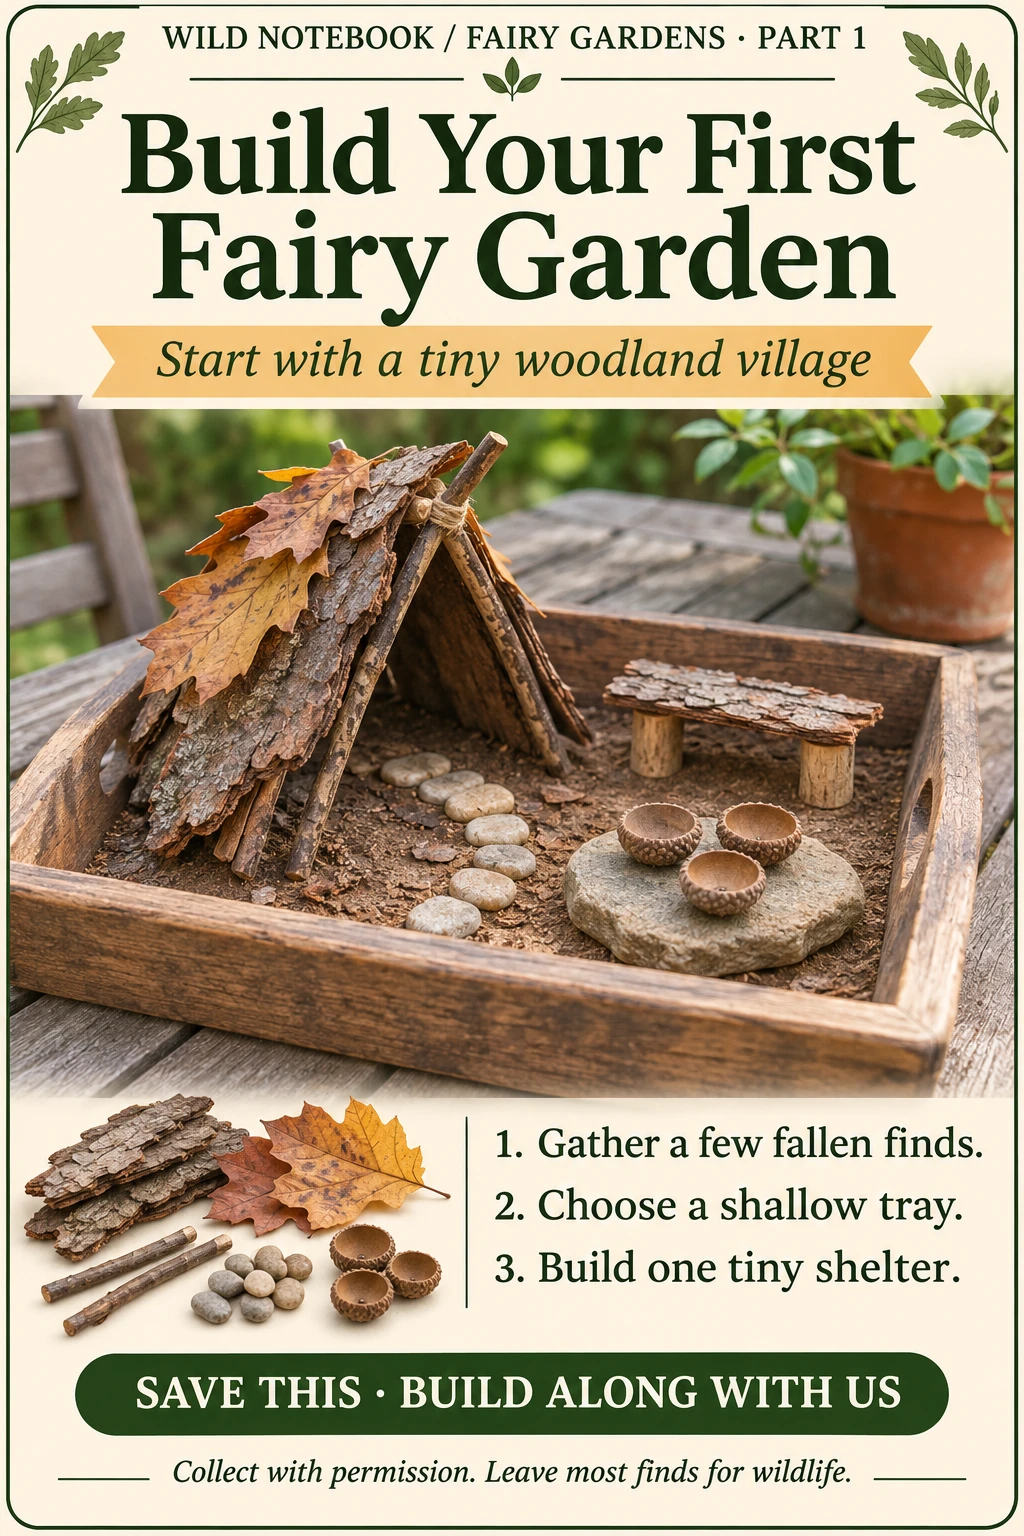
A fairy garden is a miniature landscape built for imagination. A scrap of bark becomes a roof, a pebble becomes a stepping stone, and an acorn cap becomes a bowl. Some gardens include small living plants; others are temporary scenes arranged in a tray. Our first village uses a tray and fallen materials, so you can move pieces around and build a little at a time.
A small reason to step outside
Looking for a roof-sized leaf or a straight twig gives a familiar yard a new purpose. You begin noticing textures, shapes, and colors you might usually walk past. Bring someone along and compare finds, or take a quiet walk and choose just a handful.
The making can be relaxing because the next decision is small: try this stone here, turn that piece of bark, leave an opening for a door. There’s room to experiment without needing a perfect result. Children can invent the residents and their stories, while grown-ups can enjoy the small details.
One shared village scale
Build around a resident 2½ inches (6.4 cm) tall, with finished figures 2¼–3 inches (5.7–7.6 cm) tall including hats. Figures are stationary decorations that can be repositioned. A figure up to 1½ inches (3.8 cm) wide can fit the doorway if its base and accessories also fit.
Use inches as the construction standard; centimeter equivalents are rounded. Allow about ¼ inch (0.6 cm) variation in building exteriors and ⅛ inch (0.3 cm) in furniture heights. Keep clear openings at least their stated size. Measure with a ruler rather than estimating from the example images.
Free village planning worksheet
Plan before you build with our free four-page printable. Includes a reusable layout grid, shared scale and supply checklist, a two-module example layout, and cut-and-arrange planning pieces.
Download the free 4-page planner (PDF)
No email signup or purchase required. Print single-sided on US Letter paper at 100% / Actual size, especially pages 1 and 4. Check the printed ruler before cutting out the planning pieces. These are layout aids, not full-size construction templates.
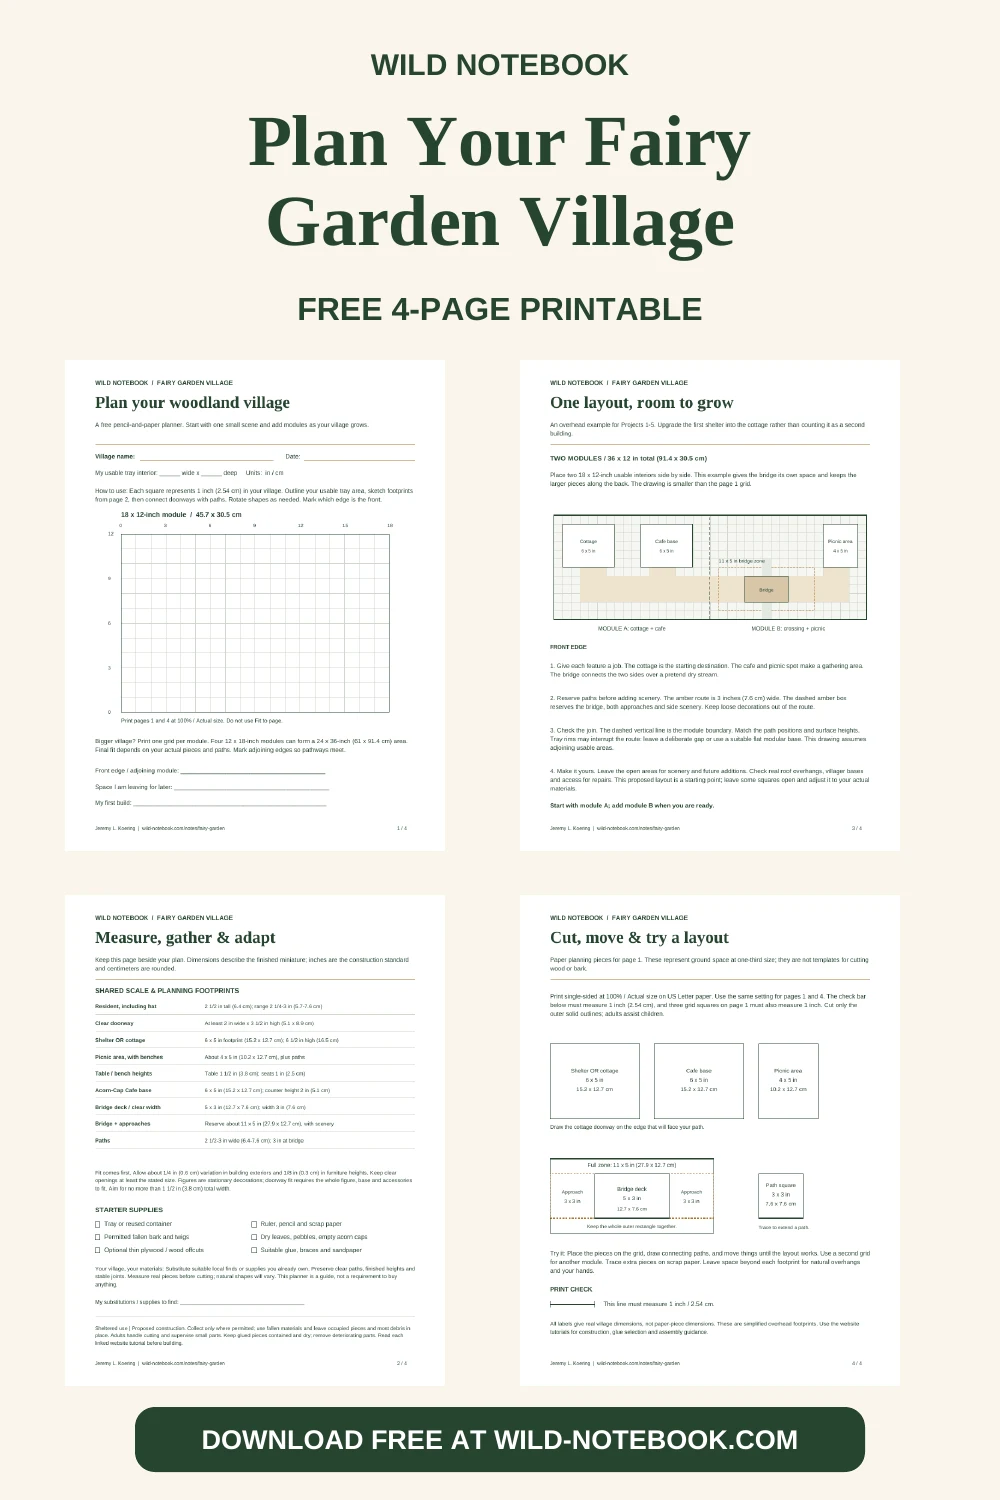
Use materials that suit your surroundings and leave room for paths, natural overhangs, and future additions. Follow the project tutorials for construction and sheltered-use guidance.
Part 1 · Start with one tiny shelter
Use what you have: Substitute suitable materials and adapt the design while keeping the finished size and stability in mind. Read our materials guidance.
Sheltered use · Proposed construction. See the shared scale.
Gather: A shallow tray or reused container, two sturdy pieces of fallen bark, several short twigs, a few dry leaves, a handful of small pebbles, and a couple of empty acorn caps. A thin layer of dry soil or sand can help pieces sit in place. An adult can help with any cutting or tying.
- Choose your base. Choose a tray with about 12 × 18 inches (30.5 × 45.7 cm) of usable interior space. Set it on a level table, porch, or other sheltered spot where you can reach it easily. Decide which edge is the front. Keep roughly half the tray open for additions. Later, add matching modules; four make a 24 × 36-inch (61 × 91.4 cm) planning area. The final layout will determine how many modules you need.
- Make a shelter. Arrange two bark pieces like a tent, aiming for an exterior about 6 inches wide × 5 inches deep × 6½ inches high (15.2 × 12.7 × 16.5 cm), including roof covering. Keep an entrance space at least 2 inches wide × 3½ inches high (5.1 × 8.9 cm). Set their bottom edges slightly into the base and use short twigs as braces. Test gently. If they slide, use steadier pieces or a firmly supported lean-to, preserving the entrance clearance. Lay a couple of dry leaves over the roof.
- Lay a path. Arrange enough pebbles to form a path from the doorway toward the front of the tray, keeping a clear width of 2½–3 inches (6.4–7.6 cm). Try a curve and a straight path before choosing.
- Add one detail. Place empty acorn caps on a flat stone as tiny bowls, or balance a flat bark piece across two small blocks for a bench. Aim for a seat 3 inches wide × 1 inch deep (7.6 × 2.5 cm), with its top 1 inch (2.5 cm) above the ground. Use broad, stable supports; omit the bench if it rocks.
- Name the place. Invent one resident and decide what they need next. Take a photo so you can see how the village changes over the series.
A sheltered tray is a good first home for these delicate pieces. Rain, wind, and drying leaves will change an outdoor village, so check it regularly and rebuild when you like. Keep glued or purchased pieces together in the tray and bring them in when they start to break down.
Optional supplies when the yard is missing a piece
Use what you find first, then fill a specific gap. Craft sticks can stand in for straight twigs, a wood slice can become a floor or tabletop, and plain pebbles can finish a path.
Affiliate disclosure: As an Amazon Associate I earn from qualifying purchases. The links below open Amazon searches for supply categories. Check dimensions, finish, age guidance, and outdoor suitability before choosing an item.
- Browse unfinished wooden craft sticks on Amazon — for straight supports, benches, and future bridges.
- Browse small unfinished wood slices on Amazon — for a flat cottage base, table, or stepping platform.
- Browse small natural craft pebbles on Amazon — for paths when suitable stones are hard to find.
Part 2 · Build a tiny bark cottage
Use what you have: Substitute suitable materials and adapt the design while keeping the finished size and stability in mind. Read our materials guidance.
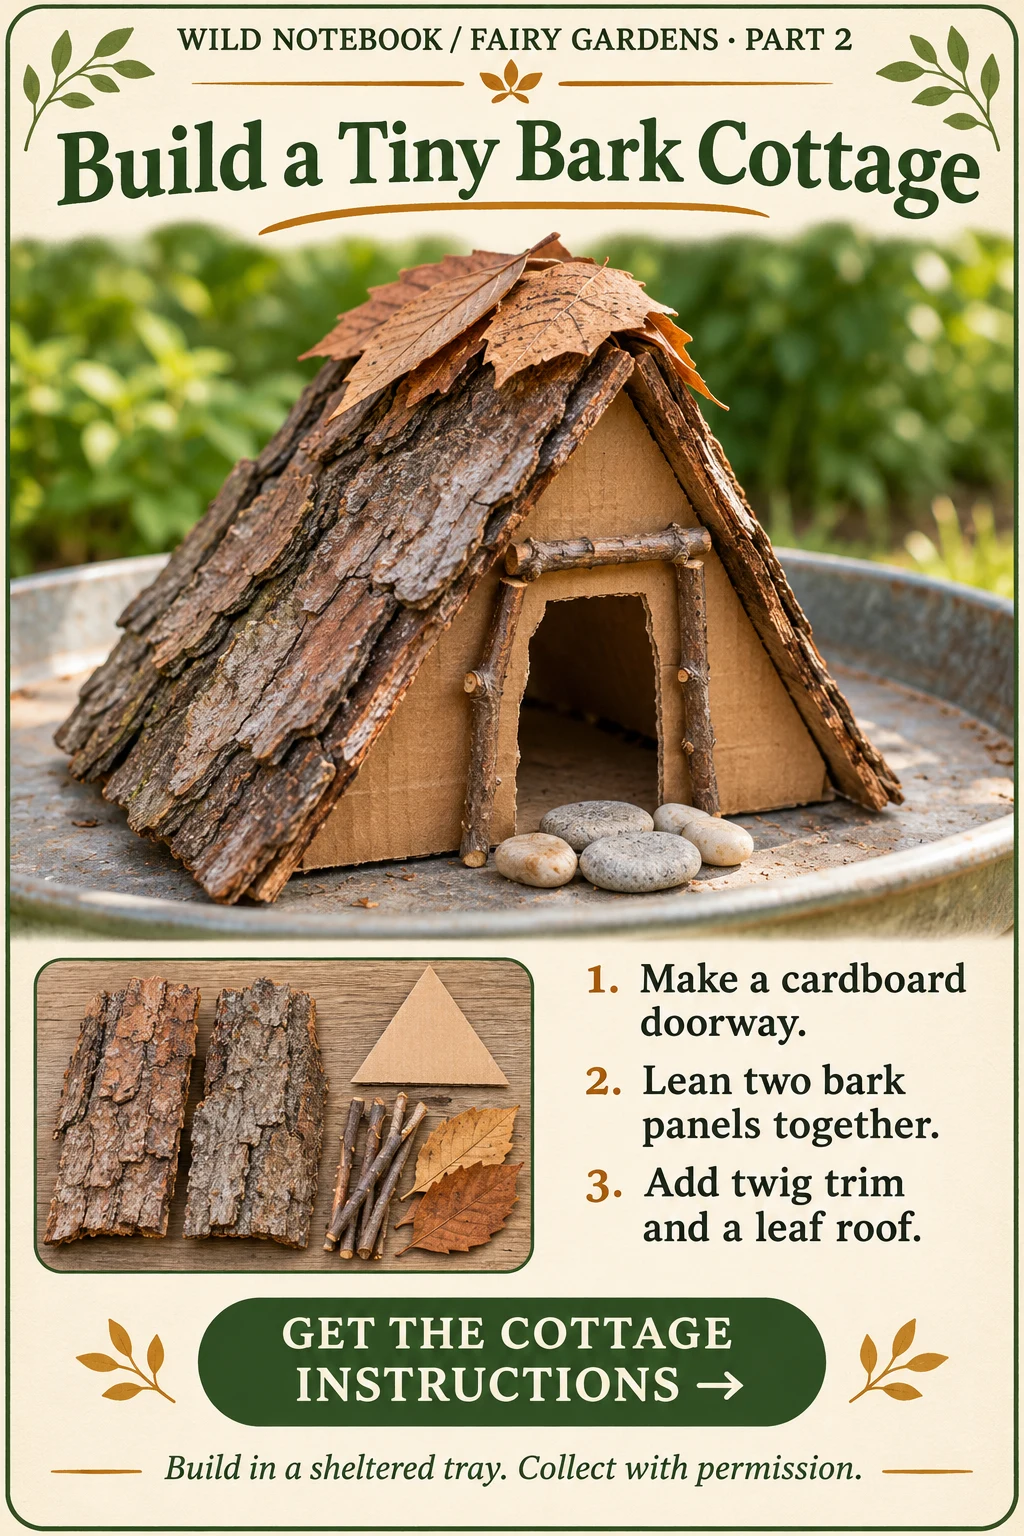
Give your first shelter a doorway and a little character. Aim for an exterior 6 inches wide × 5 inches deep × 6½ inches high (15.2 × 12.7 × 16.5 cm), including roof covering. A cardboard end wall and temporary braces support the two bark panels during assembly. Keep the cottage in a sheltered tray where the cardboard can stay dry.
Sheltered use only · Proposed construction. Use the shared scale; dry-fit every joint before gluing.
You’ll need: A ruler, two loose, dry bark pieces of similar length, a scrap of cardboard, several thin twigs, a few dry leaves, craft glue labeled suitable for the chosen materials, a pencil, and scissors. Have an adult cut the cardboard and trim any twigs.
Longer-lasting option: Replace the cardboard front wall and optional base with small pieces of thin craft plywood, about ⅛ inch (3 mm) thick. Reuse clean, untreated offcuts if available. An adult should cut the plywood with suitable tools and sand all edges smooth; scissors are for cardboard only. Trace and dry-fit the pieces as described below, allowing for the extra thickness and preserving the full doorway clearance. Use glue labeled suitable for wood and your other chosen materials, and follow its clamping and curing directions.
- Fit the walls before cutting. Dry-fit the bark into an A-frame about 6 inches (15.2 cm) wide and 6½ inches (16.5 cm) high. Each sloping panel needs roughly 7 inches (17.8 cm) from ground to ridge and about 5 inches (12.7 cm) front to back; use these as selection guides, then check the actual fit. Thin bark leaves more doorway room. Hold cardboard behind one open end and trace the triangular opening. Cut out the triangle and test its fit.
- Make the doorway. Center a rectangular opening 2 inches wide × 3½ inches high (5.1 × 8.9 cm), measured from the floor. Leave at least ¼ inch (0.6 cm) of sound cardboard between each upper doorway corner and the sloping triangle edge, plus room for glue contact. If the traced triangle is too narrow, adjust the bark or select thinner pieces before cutting; do not shrink the doorway. An adult can cut out the opening.
- Assemble the cottage. Glue the cardboard triangle inside the front edges of the bark panels. Brace the pieces with small blocks or stones while the glue dries fully according to its label. Use a flat cardboard base inside the tray if needed. Keep temporary braces in place for the full cure time on the glue label, then gently check stability before moving the cottage. Rework loose joints; do not rely on the leaf ridge to hold the roof together.
- Add the details. Glue short twigs outside the doorway opening, preserving the full 2 × 3½-inch (5.1 × 8.9 cm) clearance, then overlap a few dry leaves over the roof ridge. Place a thin, flat pebble just outside the entrance as a doorstep; keep it from blocking the opening.
- Give it an address. Set the cottage beside your first path. Decide who lives here and what they would like to see built next.
Use fallen bark you may collect, leave occupied pieces in place, and supervise small parts with young children. Keep cardboard dry and glued pieces contained in the tray. Plywood is a more durable alternative to cardboard, but it does not make this cottage weatherproof: thin craft plywood, glue joints, and dry leaves still need protection from rain and damp soil. Keep either version in a sheltered, dry location. Check for loose joints, brittle leaves, or mold; remove deteriorating pieces and store the dry cottage indoors. Adult cutting assistance is required.
Need straight pieces for trim? See the optional supply links.
Part 3 · Twig bench and picnic table
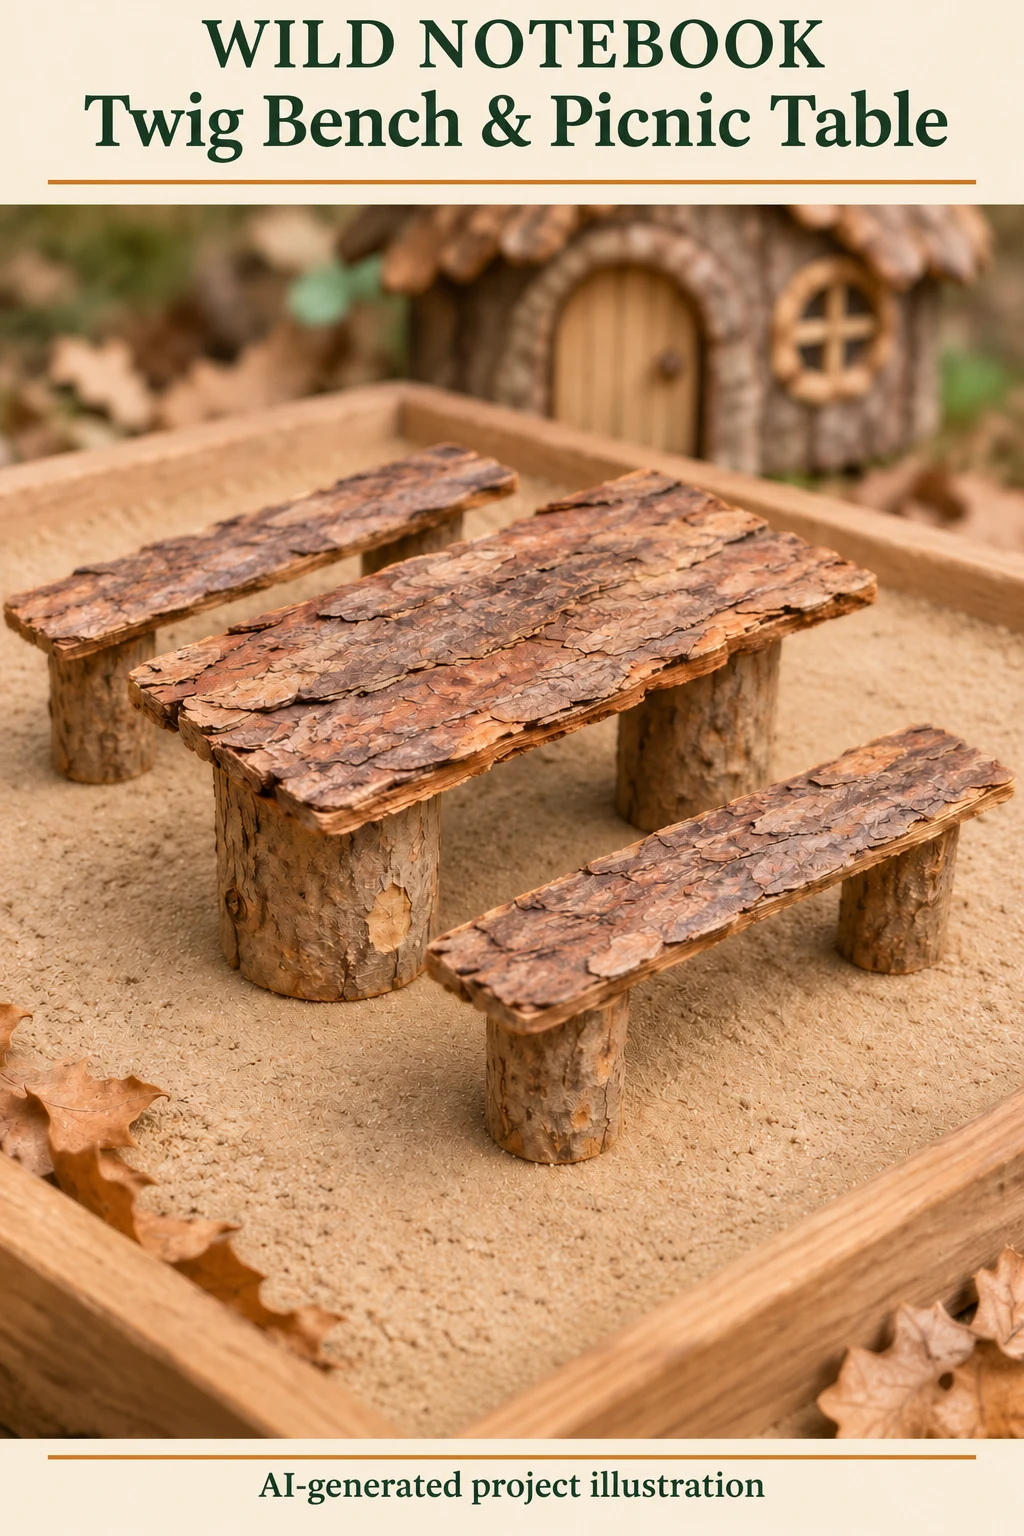
Give your village a place for picnics and a well-earned break from cottage building. Make one table and two separate backless benches.
Sheltered use · Proposed construction. Follow the shared village scale.
Use what you have: Substitute suitable materials and adapt the shapes while keeping the finished height and stability in mind. Read our materials guidance.
Materials and measurements
- One flat bark tabletop: about 3 × 2 inches (7.6 × 5.1 cm).
- Two flat bark seats: each about 3 × 1 inches (7.6 × 2.5 cm).
- Two flat-ended branch supports for the table: about 1–1¼ inches (2.5–3.2 cm) across.
- Four flat-ended branch supports for the benches: about ¾–1 inch (1.9–2.5 cm) across.
- Optional thin twig edging, cut to fit.
- Craft adhesive suitable for wood and your chosen materials, ruler, pencil, sandpaper, and adult-operated cutting tools.
Choose dry, firm bark with reasonably flat undersides. Substitute ⅛-inch (about 3 mm) craft plywood for curved or crumbly bark, and untreated wood blocks for branch supports.
Glue: Aleene’s Original Tacky Glue is a proposed option for this sheltered project. Follow the current label for application, support, and drying. Natural-material joints should be checked before use. Use a suitable adhesive you already own if preferred.
Calculate support heights
Support height = finished height minus top thickness. Aim for a table 1½ inches (3.8 cm) high and bench seats 1 inch (2.5 cm) high. With ⅛-inch tops, cut table supports about 1⅜ inches (3.5 cm) tall and bench supports about ⅞ inch (2.2 cm) tall. Uneven bark may need slightly different support lengths; aim for level surfaces, with about ⅛ inch (0.3 cm) variation in finished height.
Build your furniture
- Prepare the tops. Select pieces near the suggested dimensions. Preserve natural edges but remove loose flakes and sharp points. An adult should cut firm wood or plywood and sand it smooth.
- Prepare six supports. An adult cuts branch sections with flat, parallel ends: two taller supports for the table and two shorter supports per bench. Avoid decayed, splitting wood and loose bark at glue joints.
- Dry-fit on a level surface. Place each pair of supports upright with their centers roughly ¾ inch (1.9 cm) inward from the short ends of the top. Center them across its width. Adjust for broad contact, keeping supports beneath the top. Sand or replace rocking supports.
- Glue and brace. Mark support positions on the underside. Apply adhesive according to its label and assemble with temporary blocks to prevent movement. If weighting is appropriate for the glue, protect the top with scrap card and avoid crushing fragile bark.
- Let joints dry fully. Keep pieces level for the label’s drying or curing period. Allow an overnight rest before the first gentle handling check; cool, damp conditions or thicker glue may require longer. Move each piece by supporting its underside.
- Add optional trim. Glue thin twigs along outside edges, keeping seating and tabletop surfaces clear. Trim is decorative and should not be needed to hold the furniture together.
- Arrange your picnic spot. Place the benches parallel to the table’s long sides, with roughly ½-inch (1.3 cm) gaps. Allow about 4 × 5 inches (10.2 × 12.7 cm) for the arrangement, plus space for paths. Keep the main village path clear.
Care and family guidance
Collect permitted fallen materials, leaving occupied pieces and most debris in place. Adults handle cutting; supervise small parts around children. Keep glued pieces contained in the tray, protected from rain and damp soil. Remove pieces with loose joints, splinters, or deterioration.
The furniture matches our village scale. A standing acorn villager can stand beside it; a seated pose requires a separately designed figure.
Place it beside your bark cottage · Optional supplies · Meet a villager
Part 4 · Make an Acorn-Cap Café
Your village, your materials: These measurements are a starting point. Substitute suitable found materials or clean, untreated wood offcuts, while keeping the finished height, clear paths, and stability in mind. This guide is for a decorative miniature, not a food-serving item or a child’s toy.
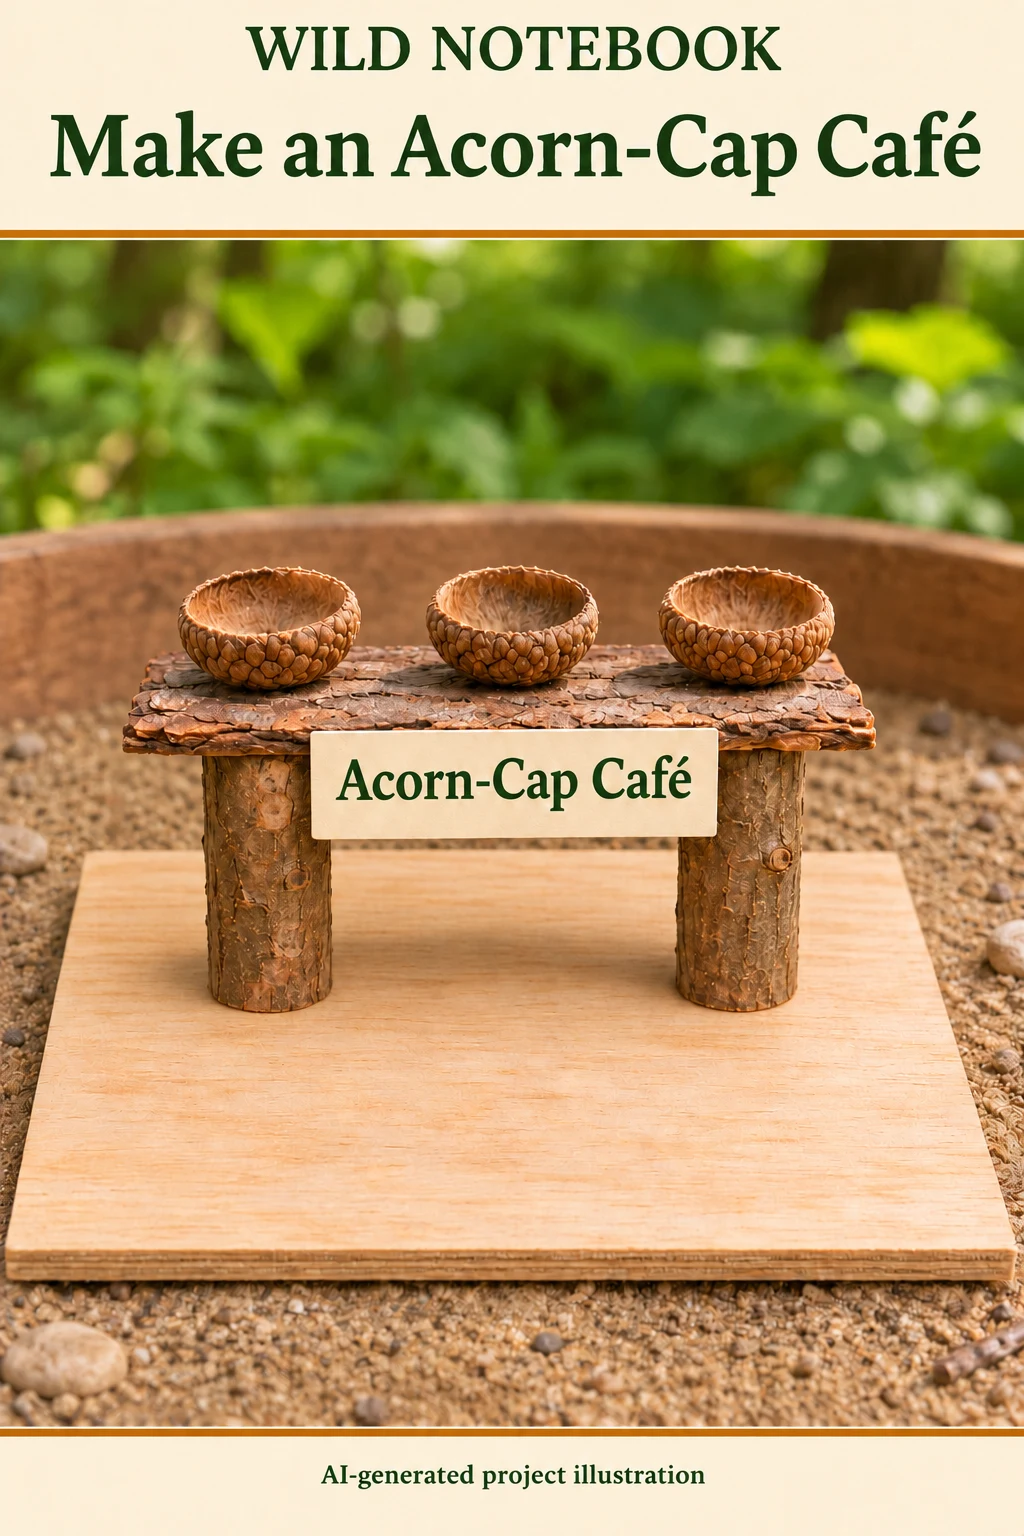
Materials and cut list
Use inches as the construction standard; centimeter equivalents are rounded. This version uses a flat base and two broad upright supports, with no canopy.
| Piece | Quantity | Dimensions / selection guide |
|---|---|---|
| Base | 1 | 6 × 5 in (15.2 × 12.7 cm); example thickness ⅛ in (about 3 mm) |
| Countertop | 1 | 4 × 1½ in (10.2 × 3.8 cm); example thickness ⅛ in (about 3 mm) |
| Branch or block supports | 2 | About 1 in (2.5 cm) across; example length 1¾ in (4.4 cm) |
| Front sign | 1 | About 2 × ¾ in (5.1 × 1.9 cm), thin card or wood |
| Empty acorn-cap dishes | 2–3 | About ½–1 in (1.3–2.5 cm) across; adjust quantity to fit |
Also gather a ruler, pencil, scrap paper, sandpaper, suitable craft adhesive, and temporary blocks for bracing. An adult needs cutting tools appropriate to the chosen wood. A marker or paint pen is optional for the sign.
Found-material options: Use firm, dry bark with a reasonably flat underside for the countertop and sound fallen branch sections for supports. Replace curved or flaky bark with thin craft plywood, and branches with untreated wood blocks. A reused flat board can replace the base; measure its thickness before cutting supports. Thin plywood must lie flat—replace a warped piece.
Glue selection: Choose an adhesive whose current label covers the materials and sheltered display conditions. Follow its application, bracing, drying, and curing directions. No new purchase is required if you already have a suitable adhesive.
Keep the height consistent
Target 2 inches (5.1 cm) from the surface beneath the base to the countertop’s upper face. This suits the village’s approximately 2½-inch (6.4 cm) standing residents.
Allow about ⅛ inch (0.3 cm) variation in finished height. Irregular bark may require individually fitted supports. A level, firmly supported counter matters more than perfectly straight natural edges. Keep the main village path 2½–3 inches (6.4–7.6 cm) wide.
Build the café
- Gather gently. Collect only where permitted. Use fallen, unoccupied materials and leave most natural debris in place. Do not strip living bark or collect living moss. Choose dry pieces without soft decay, loose flakes, or visible mold.
- Plan the footprint. Mark a 6 × 5-inch base on paper and place it beside the existing picnic furniture. Keep the main path outside this footprint. Check your actual villager’s base and accessories; the shopkeeper may stand beside the counter rather than behind it.
- Prepare the base and top. An adult cuts the wood with suitable tools and smooths all edges. Select or trim the bark top near 4 × 1½ inches. Remove only loose material; replace bark that cannot provide sound glue contact. Do not use scissors to cut plywood.
- Calculate and cut the supports. Measure base and top thicknesses, then use the height formula above. An adult cuts two supports with flat, parallel ends. For the example, both are 1¾ inches tall. Sand or replace rocking pieces.
- Mark the dry fit. On the top’s underside, mark support centers 1 inch (2.5 cm) inward from each short end and halfway across its 1½-inch depth. Keep the full support footprint beneath the top. Set the counter on the base, centered left to right, with its back edge roughly ¾ inch (1.9 cm) from the base’s back edge. Adjust that position to fit your resident.
- Check stability before glue. Rest the top on both supports. Confirm broad contact and a level surface, then mark the support outlines on the base and underside. If the counter rocks or needs thick blobs of glue to fill gaps, refit or replace the pieces.
- Assemble and brace. Following the adhesive label, attach the supports to the base, then attach the countertop at the marks. If the supports slide, brace them and let the lower joints set before adding the top. Keep glue-contact areas free of soil, loose bark, paint, and decorative trim. Use temporary blocks to hold alignment; do not crush fragile bark with weights.
- Allow the full drying or curing period. Keep the café level and sheltered for the time stated on the glue label. Leave the braces in place as directed. Allow an overnight rest before the first gentle handling check, or longer if the label, thick joints, or damp conditions require it. Lift by the base, not the countertop.
- Add the café details. Write “Acorn-Cap Café” on the sign before attaching it to the counter’s front edge. Let it hang below the edge, with its upper edge flush with the top. Use lightweight card if a wood sign is too heavy for a thin bark edge. Choose two or three cap dishes that fit without crowding; fewer is fine. Glue them to the counter or a tiny flat scrap if they tip, and allow these joints to dry fully.
- Open for imaginary business. Position the café beside Project 3’s table and benches. Check the base, supports, and decorations for movement before displaying it. Rework loose joints. Invent a menu—dew-drop tea and imaginary acorn cake require no real food, seeds, or crumbs.
Care, storage, and family use
This is a sheltered display piece. Craft plywood and glued bark do not make it weatherproof. Keep it out of rain and away from damp soil. Set it on a firm, level surface; do not bury the base. Keep glued or manufactured parts contained and remove deteriorating pieces. Store dry in a box with cushioning around the base rather than pressure on the counter.
Adults handle cutting and supervise assembly. Acorn caps and other small pieces are choking hazards; keep the finished display out of reach of young children and pets. Glued-on pieces can still loosen. Check periodically for splinters, mold, and failing joints. This decorative café is not a wildlife feeding feature.
Optional supplies and related projects
Reuse plywood, glue, and markers from the cottage and furniture projects. Use suitable supplies you already own whenever possible.
Project 3: Twig Bench & Picnic Table · Project 2: Bark Cottage · Shared village scale
Part 5 · Pebble path and twig bridge
Connect your cottage, picnic spot, and café with a small pebble path and a low, flat bridge over a pretend dry stream.
Sheltered use · Proposed construction. This decorative miniature uses a thin plywood deck beneath its twig surface. It has no load rating; reposition villagers by hand rather than treating the bridge as a toy roadway.
Your village, your materials: Substitute suitable pieces you already have. Keep the deck stable and the walking surface about 3 inches (7.6 cm) wide, consistent with our shared village scale. Read our materials guidance.
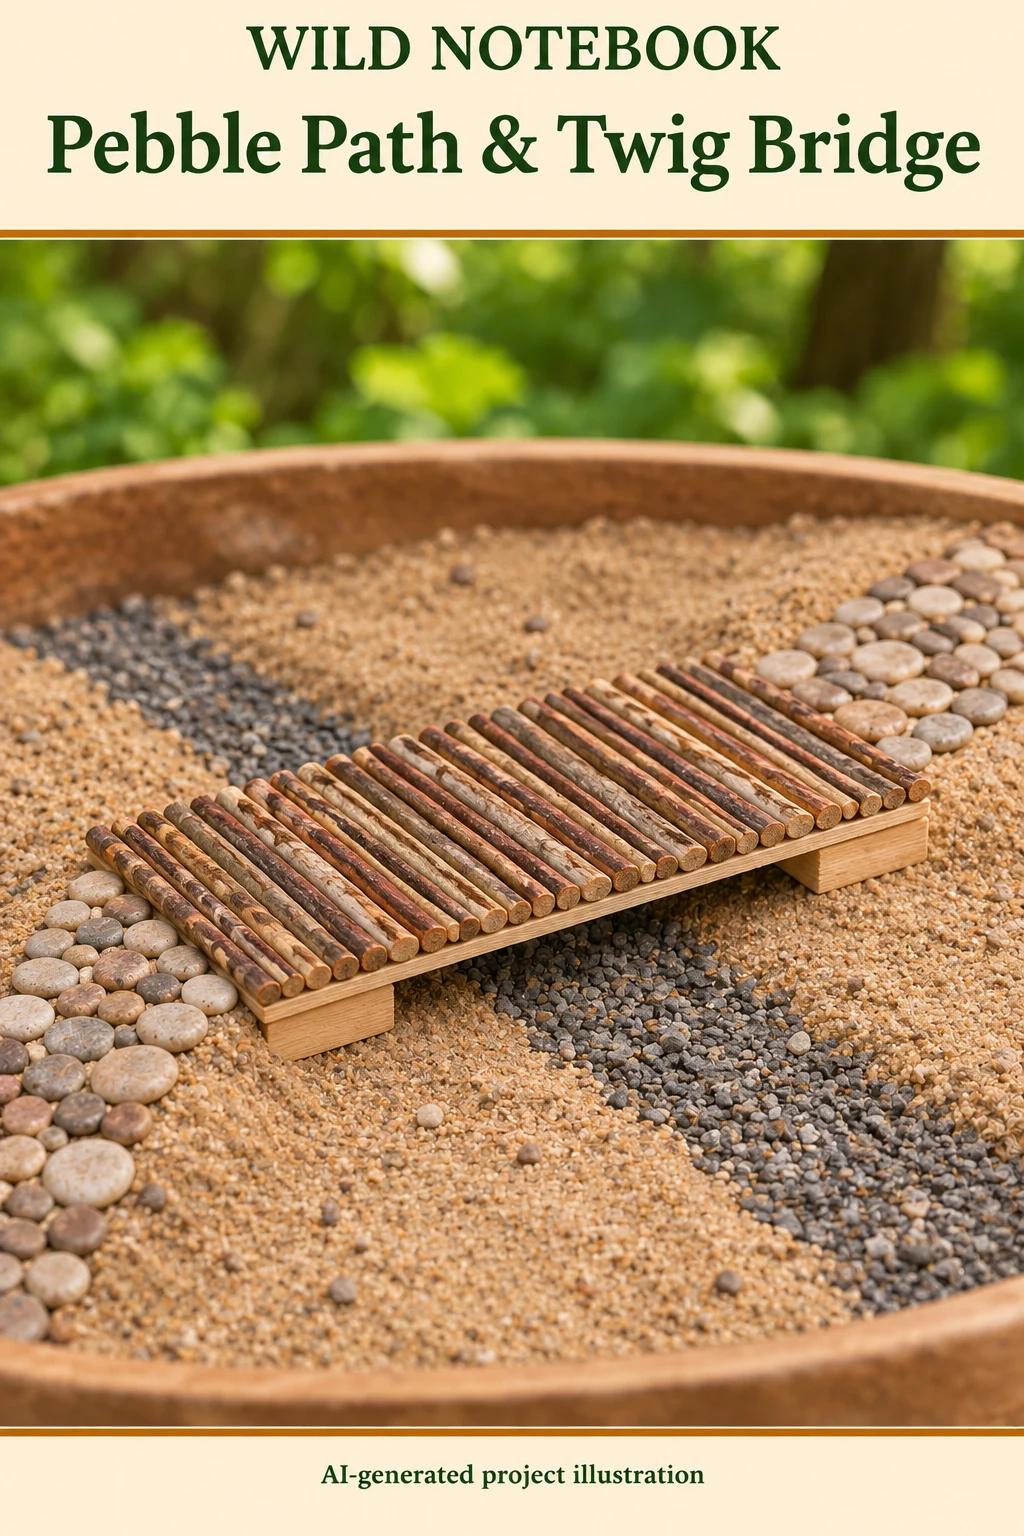
Materials and measurements
| Piece | Quantity | Dimensions |
|---|---|---|
| Plywood deck | 1 | 5 × 3 inches (12.7 × 7.6 cm), ⅛ inch (about 3 mm) thick |
| Flat wood end supports | 2 | Each 3 × 1 inches (7.6 × 2.5 cm), ¼ inch (about 6 mm) thick |
| Straight twig crosspieces | Enough to cover the deck | Each 3 inches (7.6 cm) long, about ⅛–¼ inch (3–6 mm) thick |
| Pebble path and approaches | To suit the layout | 3 inches (7.6 cm) wide; allow an approach about 3 inches long at each end |
| Pretend stream | A thin strip | Fit between the end supports, leaving them on firm footing |
Also gather a ruler, pencil, sandpaper, temporary bracing, dry sand, small flat pebbles, and craft adhesive whose label covers your chosen materials. Adults need appropriate cutting tools. A little contrasting dry sand or fine gravel can suggest a stream without water, glass, or resin.
Found materials and substitutes: Use fallen twigs with sound wood and reasonably even thickness. Clean, untreated wood offcuts can provide the deck and supports. Flat craft sticks or thin wood strips can replace uneven twigs; recalculate the finished height if their thickness differs. A firm, flat bark slab is an optional deck substitute only if it spans the gap without rocking, crumbling, or noticeable flexing; plywood is the more predictable starting point.
Glue: Reuse a suitable adhesive you already own. Follow its current label for the materials, application, support, drying, and curing time. Loose bark makes a weak contact surface: remove loose flakes or choose sounder pieces. Do not rely on glue to fill large gaps.
How the pieces fit
Lay the twigs across the 3-inch width, arranging them side by side along the deck’s 5-inch length. Attach one flat support beneath each short end, flush with the end and spanning the full width. The supports each extend 1 inch inward, leaving a 3-inch (7.6 cm) clear span between their inner faces.
Finished surface height = support thickness + deck thickness + twig thickness. With the suggested pieces, ¼ + ⅛ + ⅛–¼ inch gives a surface about ½–⅝ inch (1.3–1.6 cm) above the firm surface supporting the bridge. Aim for a level deck and similar twig thicknesses; accept roughly ⅛ inch (0.3 cm) variation, but rework rocking supports or sharp steps.
Build the path and bridge
- Plan your crossing. Mark out roughly 11 × 5 inches (27.9 × 12.7 cm) for the bridge, two approaches, and surrounding scenery. Connect the path to an existing village destination. A curve can continue beyond this area, but keep the immediate approaches aligned with the deck.
- Gather and prepare. Collect only where permitted. Use fallen, dry, unoccupied pieces and leave most debris in place. Do not strip living bark or collect living moss. Reject decayed or moldy wood. Brush away loose dirt; if washing pebbles, dry them before arranging.
- Cut the deck and supports. An adult cuts one 5 × 3-inch deck and two 3 × 1-inch supports from suitable wood, then smooths all edges. Keep the supports equal in thickness and their contact surfaces flat. Scissors are not suitable for plywood.
- Fit the twig surface. An adult trims crosspieces to about 3 inches long and smooths sharp ends. Dry-fit them across the deck, close together without overlapping. Count your actual pieces rather than using a fixed quantity. Replace sharply bent or much thicker twigs. If the last space is narrow, rearrange or select a slimmer piece rather than forcing one in.
- Glue the crosspieces. Keep the deck flat on a protected work surface. Following the adhesive label, glue each twig where it contacts the plywood. Use temporary side blocks to prevent rolling; keep the blocks free of glue. Leave the assembly flat for the label’s drying or curing period. Avoid heavy weights that could crush bark or bow the deck.
- Attach the end supports. Once the surface joints permit handling, cradle the top gently on a padded surface without pressing on individual twigs. Mark a 1-inch-deep band beneath each short end. Glue one support into each band, flush with the end and side edges. Brace as needed and allow the adhesive’s full drying or curing time. If weighting is recommended, keep pressure over supported areas rather than bending the middle.
- Check the assembly. After curing, place the bridge on a firm, level surface. Check gently for rocking, loose twigs, splitting, or deck flex. Refit unstable pieces before display. Lift beneath the deck or supports, not by a twig. Do not add heavy ornaments or use this as a weight-bearing structure.
- Arrange the dry stream. Set both supports on firm, level footing in the tray, clearing loose sand beneath them if necessary. Run a thin ribbon of contrasting sand or fine gravel between them and outward at right angles to the path. Keep it below the deck’s underside and away from the support contact points; the available clearance is only about ¼ inch (0.6 cm). No water is needed.
- Build the approaches. Shape a low mound of dry sand about 3 inches long at each end and press small flat pebbles into it. Let the path rise gently to meet the twig surface without a large step. Keep the path about 3 inches wide, and avoid packing sand underneath the deck or burying the wooden supports. Rearrange stones that tilt or roll.
- Connect the village. Continue the pebble path toward your cottage or café. Move figures by hand and place them only where they stand securely. The scene is ready for stories; the pretend stream can be a seasonal creek, a dry gully, or simply a change in texture.
Drying, care, and family guidance
Follow the adhesive label for each assembly stage. An overnight rest before gentle handling is useful, but it does not replace a longer stated cure time. Cool conditions, thick glue, and poorly fitting joints may require more time or rebuilding.
Keep the bridge in a sheltered, dry tray. Thin craft plywood, natural bark, and glue joints are not automatically weatherproof. Dry sand approaches may shift: reshape them as needed and check the bridge’s footing after moving the tray. Keep glued or manufactured components contained, remove deteriorating pieces, and store the dry bridge indoors with support beneath its ends. Do not leave it in damp soil.
Adults handle cutting and supervise assembly. Twigs, pebbles, and loose decorations can present sharp edges or choking hazards; keep the display out of reach of young children and pets. This is decorative scenery, not a wildlife habitat or water feature.
Optional supplies: Reuse suitable plywood, wood offcuts, and adhesive from earlier projects. Purchased craft strips or pebbles are optional substitutes; check their actual dimensions before changing the cut list.
Connect your bark cottage · Add the picnic furniture · Visit the Acorn-Cap Café · Shared village scale
Meet a villager · Make an acorn character
Use what you have: Substitute suitable materials and adapt the design while keeping the finished size and stability in mind. Read our materials guidance.
Every village needs someone to live there. This little resident wears an acorn-cap hat and a forest-green apron, but a scrap of fabric and a handful of fallen finds are enough to make it your own.
Sheltered use · Proposed construction. Aim for about 2½ inches (6.4 cm) tall including the hat. See the shared village scale.
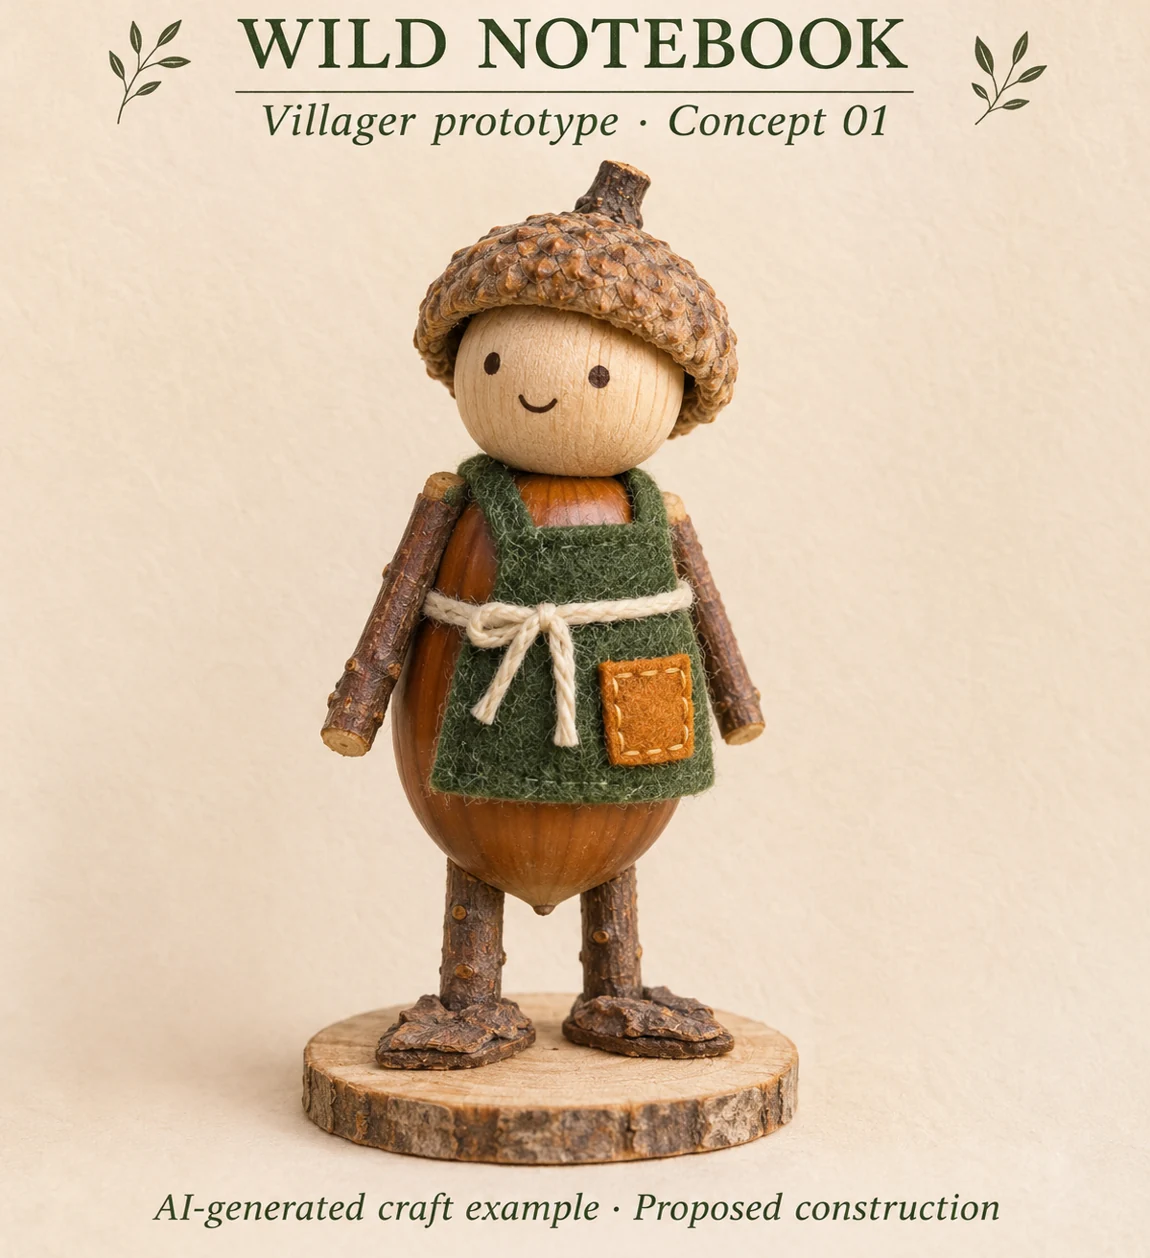
Gather: A dry acorn or small cone for the body, an empty acorn cap, a small unfinished wooden bead for the head, short twigs, a flat wood slice or scrap of craft plywood, a scrap of felt or fabric, a marker, a ruler, and craft glue suitable for wood and your other materials.
- Lay out the pieces first. Fit the cap over the bead and set both above the body. Shorten or skip the legs if the stack would exceed 3 inches (7.6 cm). If the figure will go through the cottage doorway, keep the whole piece, including its base and arms, no wider than 1½ inches (3.8 cm).
- Make a stable base. For a seated villager, glue a flat bark chip to the wood slice, then glue the body to the chip. For the standing version, have an adult trim two short twigs to equal lengths. Glue each twig to a flat bark chip for a foot, glue both feet to the base, then glue the body between the upper ends of the twigs. Brace the body while the glue cures. Use the seated version if the standing one rocks or the joints have too little surface for glue.
- Add the head and hat. Draw two dots and a smile on the bead before gluing it to the body. Add the acorn cap and two short twig arms. Keep the arms close to the body if the villager needs to fit through a doorway.
- Dress your resident. Glue on a small felt apron. Add a contrasting pocket or a short piece of cotton string for a belt if you like.
- Give them a job. Let the glue cure according to its label, then check for loose parts before moving the figure. Try a gardener by the path or a carpenter outside the bark cottage.
An adult should handle cutting and supervise assembly. This is a display piece with small parts; keep it out of reach of young children and pets. Use clean, dry, unoccupied materials and keep the finished figure sheltered.
Part 6 · Pinecone-roof fairy shop
Give your village a little shop for imagined woodland goods. A plywood shell and supported roof provide the structure; fallen bark and individual pinecone scales add the texture.
Sheltered use · Proposed construction. Follow the shared village scale and adapt materials to your surroundings. This is a decorative miniature, with adult cutting and assembly assistance.
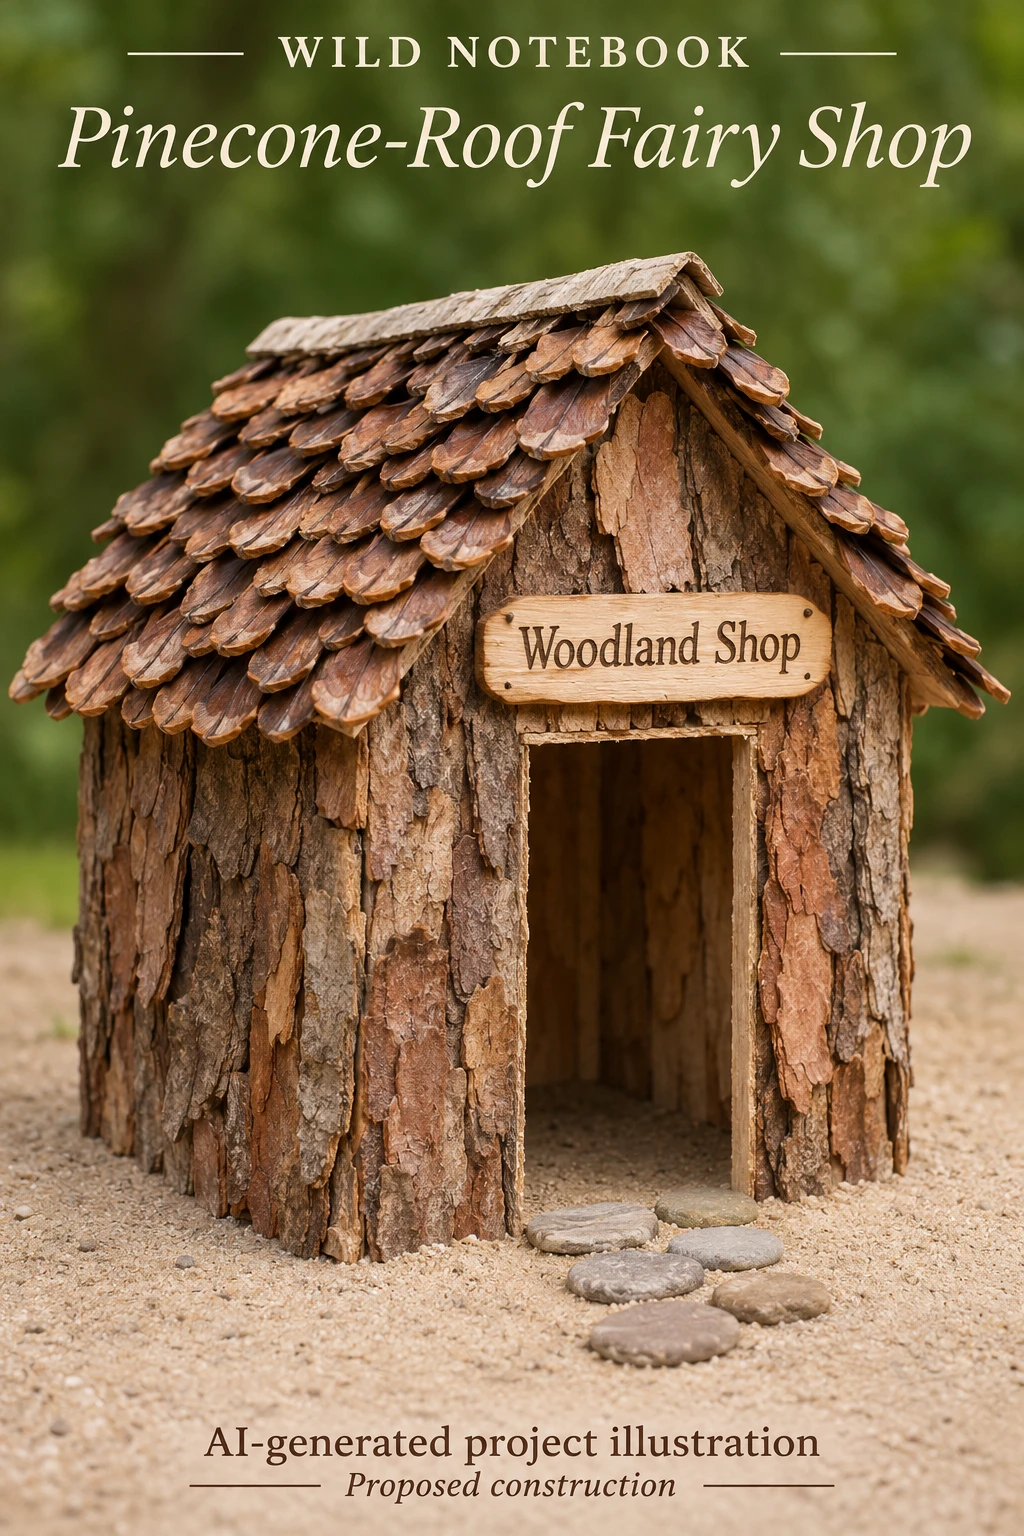
Materials and finished size
Use flat ⅛-inch (about 3 mm) craft plywood, ¼-inch (6 mm) square wood strips, dry fallen bark, small individual pinecone scales, a narrow bark ridge cap, a small sign, and flat pebbles. Gather a ruler, square, pencil, sandpaper, paper for mock-ups, temporary braces or clamps, and suitable wood adhesive. Adults need cutting tools appropriate to the wood; do not use scissors on plywood.
| Piece | Quantity | Measurements |
|---|---|---|
| Base | 1 | 8 × 7 in (20.3 × 17.8 cm) |
| Front and back gables | 2 | 5½ in (14 cm) wide; eaves 4½ in (11.4 cm), peak 6½ in (16.5 cm) above base top |
| Side walls | 2 | 4¼ × 4½ in (10.8 × 11.4 cm), fitting between front and back |
| Roof starting blanks | 2 | 4 in down slope × 5¾ in front to back (10.2 × 14.6 cm); dry-fit before trimming |
| Internal corner cleats | 4 | ¼ in square × 4¼ in long (0.6 × 10.8 cm) |
| Gable roof cleats | 4 | ¼ in square × about 3 in long (0.6 × 7.6 cm); fit to each slope |
| Open doorway | Front only | At least 2 × 3½ in (5.1 × 8.9 cm), clear after trim |
| Optional sign | 1 | About 2 × ¾ in (5.1 × 1.9 cm) |
The bare shell is 5½ × 4½ inches (14 × 11.4 cm). Bark up to ¼ inch (0.6 cm) thick brings the finished walls to approximately 6 × 5 inches (15.2 × 12.7 cm). Reserve about 7 × 6 inches (17.8 × 15.2 cm) for the roof envelope. Target total height is about 7–7¼ inches (17.8–18.4 cm), including the base and roof covering. Leave a 3-inch (7.6 cm) approach path outside the base.
Thickness matters: These cuts assume actual plywood thickness of ⅛ inch. Side-wall length equals 4½ inches minus twice the actual panel thickness. Aim for about 1/16 inch (1.6 mm) accuracy at structural joints; exterior decoration may vary roughly ¼ inch. Keep the doorway at least its stated clear size.
Build the shop
- Make a paper mock-up. Draw each gable inside a 5½ × 6½-inch rectangle. Mark the eaves 4½ inches above the bottom and join them to the centered peak. The front doorway has 1¾-inch (4.4 cm) side margins and opens to the bottom edge; leave the rear solid. Check the layout with the PDF drawings.
- Prepare and cut. Use only permitted, fallen, unoccupied materials; leave living bark, living moss, and most debris in place. Reject moldy or crumbling pieces. An adult cuts the panels and cleats and smooths their edges.
- Mark and dry-fit the shell. Center the 5½ × 4½-inch shell on the base. Fit the side walls between the gables, with one vertical cleat inside each corner contacting both panels. Check square corners and level eaves.
- Glue in stages. Attach the corner cleats and adjoining panels using the adhesive label's instructions. Glue panel bottoms and cleat ends to the base. Brace the shell square without crushing the thin plywood. Allow the full stated cure time before adding the roof.
- Add roof supports. Fit one roughly 3-inch cleat along each inside gable slope. Its upper long face must align with the slope edge so the roof rests on both. Trim ends to clear the side walls and ridge; glue, brace, and cure.
- Dry-fit the roof. Start with paper, then the two roof blanks. The 5¾-inch dimension runs front to back; the 4-inch dimension runs down the slope. Center them and leave only the small ridge gap needed for their square edges—roughly ⅛ inch (3 mm) is a starting point. Adjust fit while maintaining support on all four cleats.
- Add bark cladding. With roof panels still loose, check bark thickness and eave clearance. Keep bark outside the doorway and below the roof-bearing edges. Remove the roof panels, glue the cladding, and let it cure.
- Attach the roof panels. Glue them to the gable edges and supporting cleats. Brace without distorting the shell; let these structural joints cure fully. The decorative ridge cap does not support the roof.
- Lay small roof scales. An adult separates scales only where this can be done safely. Skip stubborn, brittle, or sharply pointed pieces. Dry-fit a bottom row with sound contact, then overlap successive rows slightly and stagger the seams. Glue in manageable rows, following the label's set time. Avoid a heavy stack.
- Finish and arrange. Add a narrow lightweight bark ridge cap and the sign after the shingles cure. Keep trim outside the clear doorway. Arrange flat pebbles along the approach. To disguise the base as in the illustration, use a shallow removable layer of dry display sand inside a contained tray; avoid damp soil and keep joints accessible for inspection.
Substitutes, glue, and care
Use thin bark shingles or small wood shingles if your pinecone scales split, have sharp points, or do not sit securely. Clean wood offcuts and pre-cut panels can reduce cutting. A cardboard mock-up helps check fit, but is not a more durable structural substitute. Reuse supplies from earlier projects; no particular brand or new purchase is required.
Choose adhesive whose current label covers the actual materials and dry sheltered use. Follow its handling, clamping, and full-cure directions; there is no universal drying time. Sound contact surfaces matter more than extra glue. An adult handles cutting and scale preparation; small parts and sharp edges require supervision.
Keep the shop dry and sheltered. Thin plywood and glue do not make it weatherproof. Check for loose scales, splinters, mold, and failed joints. Keep manufactured or glued parts contained and remove deteriorating pieces. Lift beneath the base, never by the roof; store dry indoors with support beneath the base and keep small parts out of reach of young children and pets.
Connect your shop to the pebble path and twig bridge, add a resting place, or plan its position with the free village planner.
Part 7 · Village signpost and mailbox
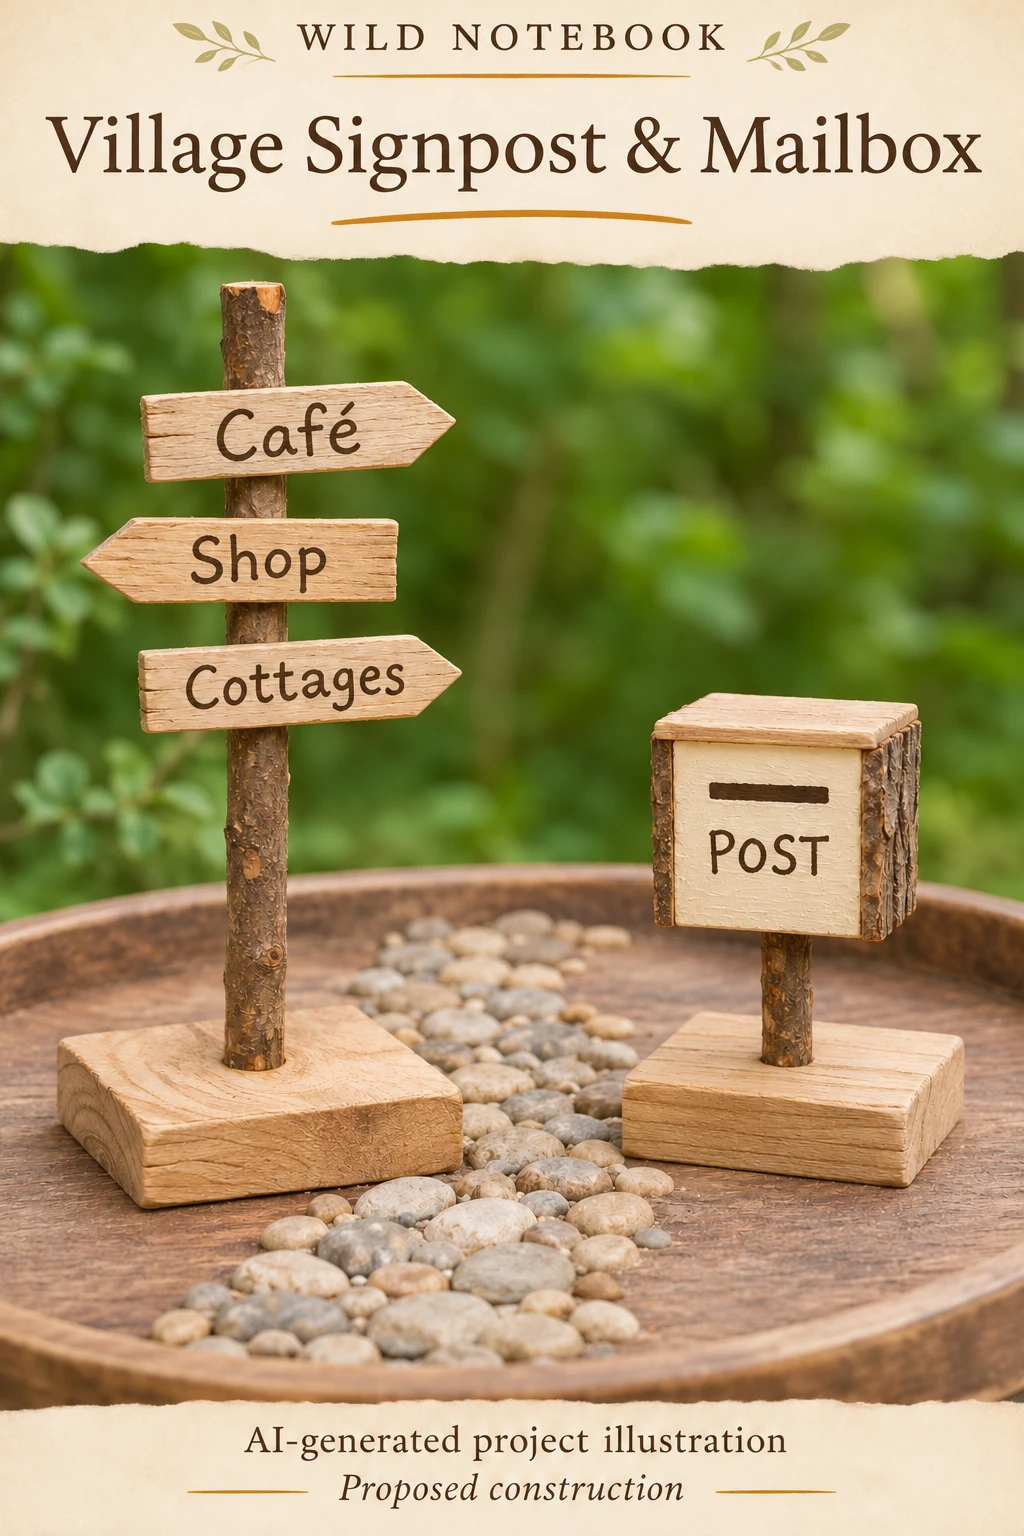
Give your woodland village directions and a place for imaginary mail. Use fallen twigs, small wood offcuts, and handwritten labels to make a signpost and decorative mailbox.
Sheltered use · Proposed construction. The mailbox is a solid block with a painted slot, not a working box. Signs attach with glue, without nails. Adults handle cutting, drilling, and preparing flat contact areas.
Materials and scale
The signpost stands 4 inches (10.2 cm) above its base. The mailbox body begins 1½ inches (3.8 cm) above its base and is 1 inch (2.5 cm) tall. Both bases are ½ inch (1.3 cm) thick, giving total heights of about 4½ inches (11.4 cm) and 3 inches (7.6 cm), before an optional mailbox cap. These fit our shared village scale.
| Piece | Quantity | Measurements |
|---|---|---|
| Signpost base | 1 | 3 x 3 x 1/2 in (7.6 x 7.6 x 1.3 cm) |
| Mailbox base | 1 | 2 1/2 x 2 1/2 x 1/2 in (6.4 x 6.4 x 1.3 cm) |
| Signpost twig | 1 | 4 1/4 in (10.8 cm) long; 1/4-3/8 in diameter |
| Sign boards | 3 | 2 x 1/2 x about 1/16 in (5.1 x 1.3 x 0.16 cm) |
| Mailbox solid block | 1 | 1 W x 3/4 D x 1 H in (2.5 x 1.9 x 2.5 cm) |
| Mailbox twig | 1 | 2 in (5.1 cm) long; 1/4-3/8 in diameter |
Twig diameter is about 6–10 mm. Also gather thin fallen bark, suitable wood adhesive, warm ivory paint, a dark fine-tip paint pen, ruler, pencil, square, sandpaper, clamps, scrap backing wood, and adult-operated cutting and drilling tools. Check glue and paint labels for the actual materials and intended use.
Your village, your materials: Reuse clean untreated offcuts, flat craft-stick pieces, or a suitable dowel. Firm thin bark can replace a sign if it is flat enough to write on and attach securely. Preserve finished heights and stable footprints. No particular brand or new purchase is required. More substitution guidance.
How the joints fit
Each centered base hole is ¼ inch (6 mm) deep, leaving about ¼ inch of wood below it. The mailbox underside also receives a centered ¼-inch-deep hole. Match the hole to the prepared twig end for a close slip fit; do not force it or rely on excess glue to fill a loose joint.
Signpost cut length: 4 inches exposed + ¼ inch in the base = 4¼ inches (10.8 cm). Mailbox twig: 1½ inches exposed + ¼ inch in the base + ¼ inch in the block = 2 inches (5.1 cm). Recalculate if actual seating depths change.
Drilling: An adult clamps each piece securely on backing wood and uses a suitable depth stop. Never hold a tiny block in your fingers while drilling. Reject cracked pieces and use prepared parts if a piece cannot be clamped safely. Allow about ⅛ inch (3 mm) variation in decorative placement; joint fit and depth need closer control.
Build the signpost and mailbox
- Prepare the pieces. Collect only where permitted, using fallen, dry, unoccupied materials. Leave living bark, living moss, and most natural debris in place. Cut and smooth the base, twig, and boards with adult help. Arrow tips are optional; round sharp points.
- Fit the base joint. Mark the base center, drill the proposed 1/4-in-deep hole, and dry-fit the post. Check that it stands upright and remains 4 inches above the base. Sand the end gently or replace a poorly fitting twig rather than hammering it in.
- Mark sign positions. With the twig seated, mark board centerlines at 2 1/4, 3, and 3 3/4 inches above the base top. The top board ends at the 4-inch height. Prepare flat contact areas on the same side of the post.
- Write before gluing. Practice Café, Shop, and Cottages on paper. Lightly pencil simple letters on the boards, then use a fine dark paint pen. Slight variations suit the handmade look. Let the ink or paint dry as labeled; keep glue-contact areas bare.
- Attach the boards. Lay the post on a protected surface and brace against rolling. Arrange signs in the chosen directions. Apply adhesive at the flat contact areas and support each board until set. Follow the label for clamping and full cure; do not add nails.
- Glue the post into its base. Once the signs can be handled, glue the fitted post end into the base hole. Brace upright with a square or temporary supports, keeping braces free of glue. Let the joint fully cure before standing the finished piece in the tray.
- Prepare the solid mailbox. Cut and smooth the 1 x 3/4 x 1-inch block. Mark its underside center and drill the fitted 1/4-in-deep hole with the block clamped safely. Drill the matching centered hole in its base. Dry-fit the 2-inch twig into both: 1 1/2 inches should remain exposed.
- Paint the front by hand. Apply a thin warm ivory coat, leaving the underside joint bare. Let it dry. Handwrite POST with a dark fine-tip paint pen. Add a flat painted dash about 1/2 inch (1.3 cm) long above the word to suggest a mail slot. Do not cut a slot or hollow the block.
- Add optional texture. Glue thin sound bark to the sides, keeping the front readable and the underside clear. A thin wood cap can be about 1 1/8 x 7/8 in (2.9 x 2.2 cm), no more than 1/8 in (3 mm) thick. It slightly increases overall height; it is decoration, not weatherproofing.
- Glue and brace. Glue the twig into the base first and support it upright. After that joint cures, glue the mailbox onto the top end, centered and level. Brace the block without loading the new joint. Keep the front oriented as intended and follow the adhesive label at each stage.
- Check and place. After full cure, gently check for wobble, loose boards, or shifting joints. Refit unstable parts. Place both bases flat in a dry, sheltered tray beside the path. Leave enough clearance that signs and bases do not block the route. Lift by the base, never by a sign or mailbox.
Drying, care, and family guidance
Glue and paint labels control drying, clamping, handling, and full-cure times. There is no universal overnight cure. Repair poor fit rather than adding more adhesive. Keep glue-contact areas free of paint and loose bark.
Keep these decorative pieces in a dry, sheltered tray. Paint and plywood do not automatically make them weatherproof. Check for splitting, mold, peeling bark, and loose joints after moving the tray. Contain glued or manufactured parts, remove deteriorating pieces, and store indoors with support beneath the bases.
Adults handle cutting, drilling, and contact-face preparation. Children can choose names, practice lettering, and arrange pieces with supervision. Keep small parts away from young children and pets. Follow product labels for ventilation, skin contact, and cleanup. Collect only where permitted; use fallen, unoccupied materials and leave living bark, living moss, and most natural debris in place.
Place the bases beside the path, leaving 2½–3 inches (6.4–7.6 cm) clear for the route. Point signs toward your café, shop, and cottage, or invent your own destinations. Plan their positions with the free village planner.
From one shelter to a woodland town
Build now
- Start your village with a tray, shelter, and first path.
- Build a bark cottage with a doorway.
- Build a twig bench and picnic table for a village gathering spot.
- Make an Acorn-Cap Café with a serving counter and tiny dishes.
- Build a pebble path and twig bridge to connect your village.
- Build a pinecone-roof fairy shop with a supported roof and bark walls.
- Make a village signpost and mailbox with handwritten labels.
Companion activity: Meet a villager.
Download the free four-page village planner.
Coming next
- A miniature living village garden.
Future installments will be linked here as they’re published. Follow Wild Notebook on Pinterest to collect the series.
Keep exploring outside
Try our fall nature crafts · Start a backyard habitat patch · Browse the field guides
Further inspiration: Bureau of Land Management’s Build a Fairy Home activity (PDF), which combines natural materials, imagination, and observation.